 Save
Save I still remember the winter I decided to build a gingerbread house frame for the first time—not the traditional enclosed cottage, but something more daring: a magnificent border that would frame an entire platter of holiday treats. My grandmother had always made solid houses, but I wanted something that felt like an invitation, a edible architecture that celebrated everything we'd bake together that season. The moment I pulled those golden-brown panels from the oven and watched them cool on the rack, I knew this would become our signature centerpiece, the one everyone asked about year after year.
That first year, I assembled the house frame while my sister sat at the kitchen counter with hot cocoa, and we laughed as the royal icing kept setting just right—not too fast, not too slow. When we placed it on the platter surrounded by our favorite decorated cookies, our mother walked in and actually gasped. That's when I understood: this wasn't just gingerbread and sugar. It was a frame for memories, literally surrounding the treats that would be shared with people we loved.
Ingredients
- All-purpose flour (300g): The foundation that gives your gingerbread structure and helps the panels stay rigid when assembled—don't skimp on measuring, as too much flour makes the dough tough
- Brown sugar (100g): Brings a deeper molasses undertone that white sugar simply can't match, grounding the spice flavors in warmth
- Unsalted butter (100g), softened: Room temperature is non-negotiable here; cold butter won't cream properly and your dough will be dense rather than tender
- Molasses or dark honey (100g): The soul of gingerbread—molasses gives that authentic, slightly bitter complexity that makes people say 'I can't quite identify that flavor, but I love it'
- Large egg (1): Acts as the binder that keeps everything unified, so it must be room temperature to incorporate smoothly
- Ground ginger (1 tsp): Fresh and zingy compared to stale spice, so check your tin and smell before using—if it's been sitting for years, replace it
- Ground cinnamon (1 tsp): The warm backbone, the spice that says 'holiday' without saying a word
- Ground cloves (½ tsp): Use sparingly—this spice is powerful and can overwhelm quickly, but it's what gives gingerbread that slightly sophisticated bite
- Baking soda (½ tsp): Creates subtle rise and tender crumb; it's not about puffing up, it's about gentle transformation
- Salt (¼ tsp): Amplifies all the spices and prevents the sweet from becoming cloying
- Egg white (1): For the royal icing that becomes your edible glue—use pasteurized eggs if you're concerned about raw egg safety
- Powdered sugar (200g), sifted: Must be sifted to avoid lumps that will ruin your smooth, glossy icing texture
- Lemon juice (½ tsp): Cuts through the sweetness and stabilizes the icing, plus adds a subtle brightness
- White chocolate (50g), melted: Your drizzle decoration that creates contrast against the dark gingerbread and adds richness
- Assorted candies: Let these be your artistic expression—chocolate buttons, white sprinkles, mini marshmallows—whatever brings you joy
Tired of Takeout? 🥡
Get 10 meals you can make faster than delivery arrives. Seriously.
One email. No spam. Unsubscribe anytime.
Instructions
- Cream your butter and sugar into clouds:
- In a large bowl, beat the softened butter with brown sugar for about three minutes until the mixture looks light and fluffy, almost like sandy soil. This isn't just mixing—you're aerating the butter, creating tiny air pockets that will make your gingerbread tender rather than dense. You'll feel the transformation under your whisk or mixer beaters.
- Marry in the egg and molasses:
- Add your room-temperature egg and pour in that dark, fragrant molasses. Mix until everything is completely incorporated and the batter shifts from tan to a rich brown. Scrape down the bowl occasionally because those brown bits stuck to the sides contain flavor you don't want to lose.
- Combine your dry architecture:
- In a separate bowl, whisk together flour, ginger, cinnamon, cloves, baking soda, and salt. Whisking them together (rather than just mixing) ensures the leavening and spices distribute evenly throughout—this step creates consistency in every bite.
- Build your dough gently:
- Gradually add the dry mixture to your wet ingredients, stirring just until you can't see flour streaks. The dough will be thick and slightly sticky. Wrap it tightly in plastic wrap and place it in the refrigerator for at least thirty minutes, though overnight is even better—cold dough is easier to roll and holds panel shapes without slumping.
- Prepare your oven and workspace:
- Preheat to 180°C (350°F). Line your baking sheet with parchment paper so nothing sticks and your panels release perfectly. Have your templates ready—you can print house panel shapes online or cut your own from cardboard.
- Roll and cut with intention:
- On a lightly floured surface, roll your chilled dough to exactly five millimeters thick—a ruler actually helps here. Using templates (aiming for panels about ten to twelve centimeters), carefully cut out your front, back, two sides, and roof pieces. Work on a cool surface if possible; warm dough is harder to work with.
- Bake until firm at the edges:
- Place panels on your parchment-lined sheet and bake for ten to twelve minutes—you're looking for edges that feel just firm to the touch, not soft or deeply brown. The centers will still feel slightly yielding. This matters because overly baked panels become brittle and crack during assembly.
- Cool completely before assembly:
- Transfer to a wire rack and let sit for at least twenty minutes. The panels will continue to set as they cool, becoming more rigid and easier to handle. This patience is not optional—warm gingerbread is forgiving to break.
- Whip your royal icing into submission:
- Beat one room-temperature egg white to soft peaks—you should see trails when you lift the whisk. Gradually add your sifted powdered sugar and lemon juice, beating continuously until the icing transforms into thick, glossy peaks. This is your edible glue and your decoration, so texture matters.
- Assemble with the confidence of an architect:
- Working on your serving platter, pipe or spread royal icing along the edges where panels meet. Press each piece together gently, holding briefly to let the icing set just enough. Build vertically, connecting sides to front and back, then secure the roof pieces. The whole structure is stronger than you might think.
- Let gravity and time do the setting:
- Once assembled, allow the frame to sit undisturbed for at least thirty minutes—this is when the royal icing hardens and everything becomes solid. You'll feel the shift from slightly wobbly to genuinely sturdy.
- Decorate with joy and creativity:
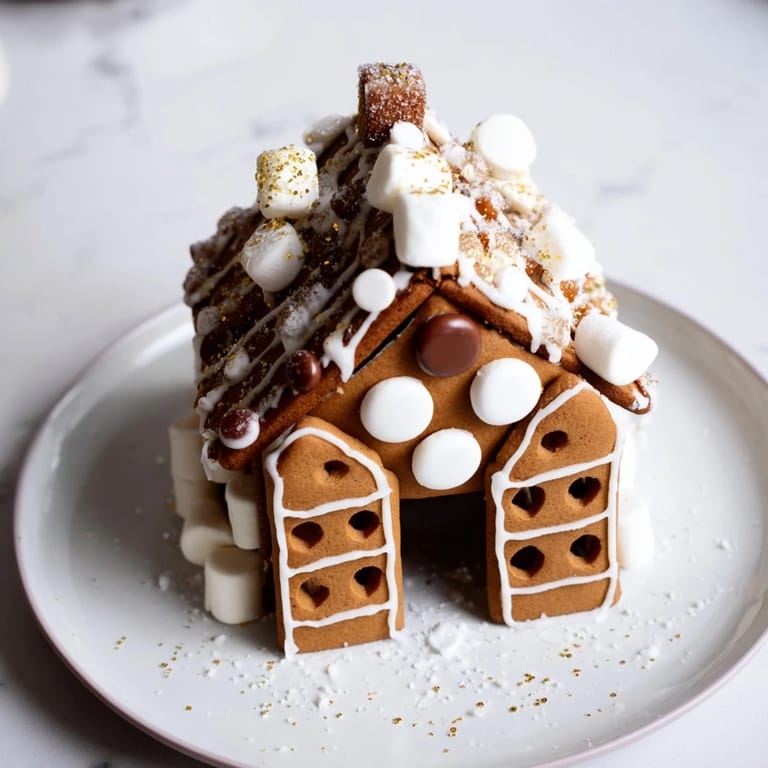
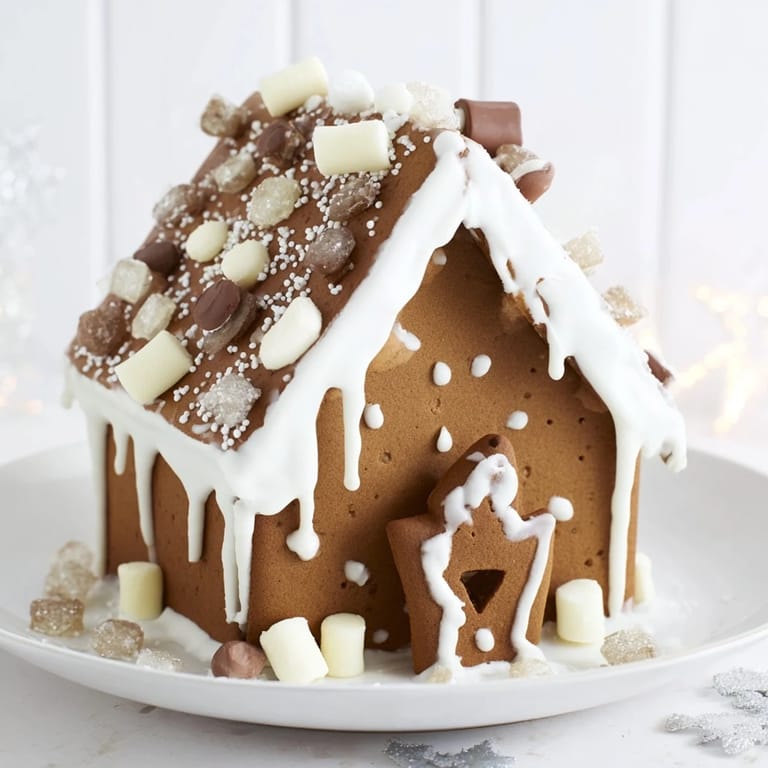
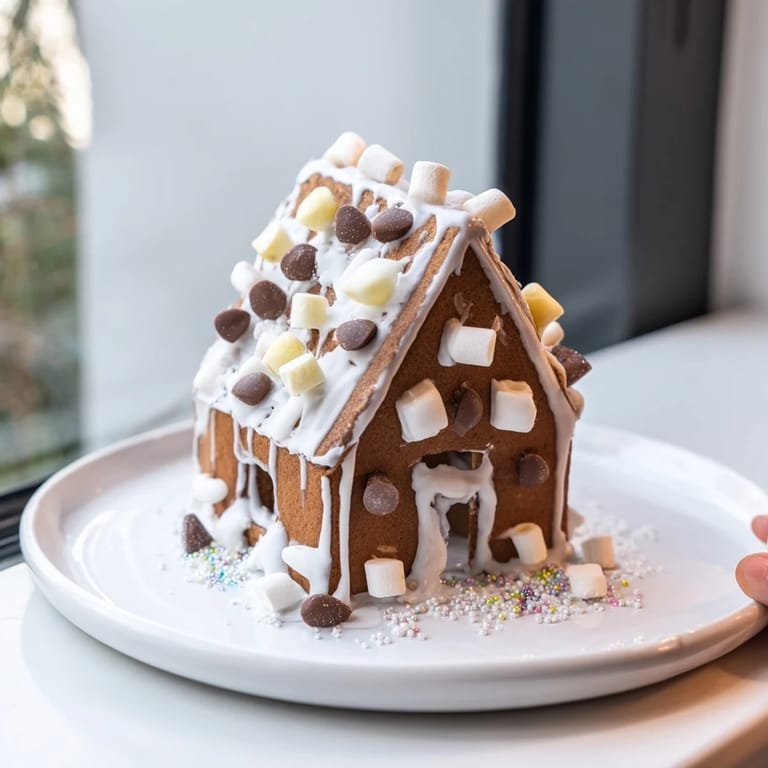
- Pipe or drizzle melted white chocolate across the frame. Attach candies using small dots of royal icing as adhesive. Layer your decorations—don't just coat everything at once; build interest with white sprinkles on some sections, chocolate buttons on others, tiny marshmallows tucked into corners. Dust with edible glitter if you're feeling fancy.
- Create your platter composition:
- Once fully set, arrange your gingerbread frame on the platter. Fill the center and around the edges with additional cookies, roasted nuts, or holiday treats. Step back and look at what you've created—you've turned sugar, butter, and spice into an edible work of art.
 Save
Save Last December, I watched my eight-year-old nephew stare at the completed gingerbread frame for nearly three minutes before carefully reaching out to touch it. 'It's real edible?' he whispered, as if he'd discovered magic in the middle of the dessert table. When he realized he could actually eat a corner, his face transformed into pure wonder. That moment reminded me that cooking isn't about impressing people with technique—it's about creating genuine delight, the kind that makes people forget everything else for just a moment.
The Story Behind the Frame
Traditional gingerbread houses have always felt intimidating to me—so much work, and if something goes wrong, you're standing there with a collapsed gingerbread cottage. But the frame concept clicked when I realized I could create visual impact without the pressure of perfect structural integrity. This approach celebrates the architecture itself—making the gingerbread the star rather than an afterthought. The frame acts as a border that draws attention to everything inside it, whether that's beautiful decorated cookies, candied fruits, or spiced nuts. It's a more relaxed, forgiving approach to holiday baking, and honestly, that's when the best things happen in the kitchen—when you stop trying so hard and start having fun.
Timing and Make-Ahead Strategy
The beauty of this recipe lives in the timeline flexibility. Bake your panels on Day One, store them airtight for up to three days, and they'll remain perfectly crisp. On Day Two, make your royal icing and assemble everything in about thirty minutes. This breakdown means you're never stressed, never rushing, never wishing you had more hands. I've learned that the best entertaining happens when you're not frantically working in the kitchen while guests arrive—when you're calm enough to actually enjoy the decorating process, the icing sets more evenly, and you make better creative decisions about placement and color. Plus, if you bake ahead, you can taste-test a corner panel to make sure your spice balance is perfect before committing to the full assembly.
Decoration as Personal Expression
Here's what I've discovered about decorating the gingerbread frame: there's no such thing as wrong. I've seen versions with strict geometric precision, others with delightful chaos, and everything in between—and they're all beautiful because they reflect who made them. Last year, I used only white candies and silver pearls for an elegant, snowy look. The year before, I went maximalist with chocolate, caramel, and gold. The spice and structure of the gingerbread stays the same, but your decorative choices tell the story of your holidays, your preferences, your creative mood. White chocolate drizzles create contrast and catch the light beautifully, while candies add pops of color and texture. Here's my philosophy: cluster similar colors together rather than scattering everything randomly, drizzle white chocolate last so it catches the eye, and don't be afraid of bare spots—they actually make the decorated areas feel more intentional and less chaotic.
- Start with the candies you love most, placing them first while you're still deciding on the overall aesthetic
- White chocolate drizzles can salvage any imperfect placement by drawing the eye to specific areas you want to emphasize
- Step back frequently to view the frame from a distance—what looks good up close might feel unbalanced from across the table
 Save
Save Every time I set this gingerbread frame on the table, I think about how food connects us—not just physically, but through all the tiny moments of care that go into creating something beautiful. This frame, this border of spiced dough and royal icing and candies, becomes the frame for conversations and laughter and the kind of casual eating that happens when people gather around something homemade. Make this. Share it. Watch someone's face light up when they realize it's edible.
Common recipe questions
- → What ingredients give the gingerbread its classic flavor?
Ground ginger, cinnamon, cloves, molasses or dark honey, and brown sugar combine to create the warm, spiced flavor typical of this gingerbread dough.
- → How thick should the dough be rolled before baking?
Roll the dough to about 5 mm thickness to ensure sturdy yet tender panels suitable for assembly.
- → What is the purpose of royal icing in the frame construction?
Royal icing acts as a strong edible adhesive to hold the gingerbread panels securely together while drying to a firm finish.
- → Can the gingerbread house frame be decorated in advance?
Yes, after assembling and allowing it to dry fully, the frame can be decorated with white chocolate drizzles and assorted candies, and stored carefully before display.
- → Are there tips to make the panels more durable?
Baking the panels a day ahead and storing them airtight helps achieve extra sturdiness for assembly and handling.
- → How can I adapt the icing for dietary preferences?
The traditional royal icing can be swapped for vegan alternatives to accommodate different dietary needs without sacrificing structure.