 Save
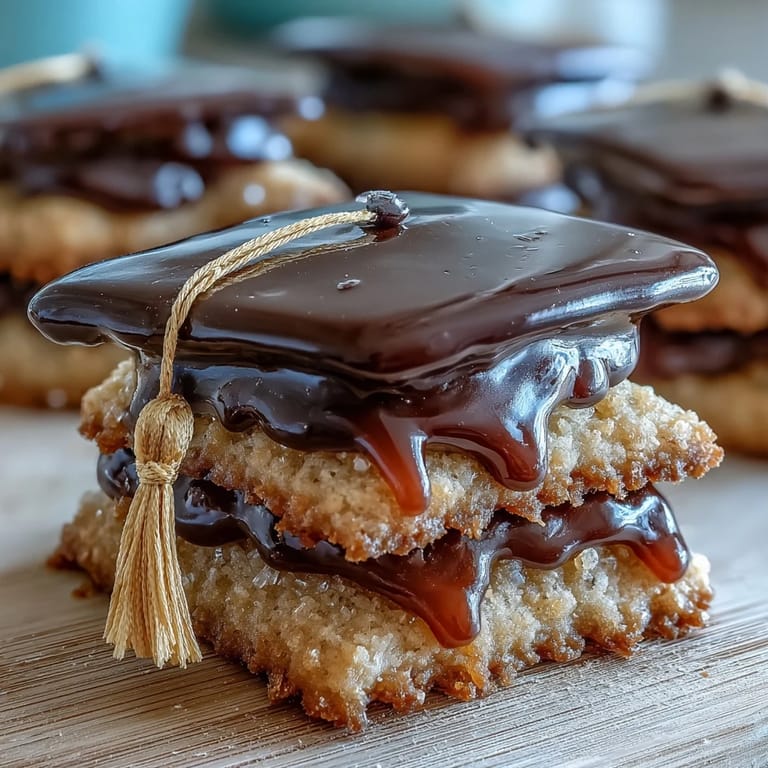
Save My cousin texted me three weeks before her graduation asking if I could make something special for her party, and my mind immediately went to these graduation cap cookies. There's something about decorating sugar cookies that turns a simple dessert into a celebration, especially when you're piping tiny tassels onto each one like you're giving them little diplomas of their own. The first batch I made, I got overzealous with the black icing and flooded half the cookies too thick, but by the second attempt, I'd found the rhythm. Now these cookies are my go-to for marking milestones, because they're just fancy enough to feel meaningful but simple enough that you won't spend your whole evening stressing in the kitchen.
I'll never forget watching my friend Sarah carefully pipe the yellow tassels onto her batch while we sat at her kitchen island on a lazy Saturday afternoon, just talking about life after college and laughing at how shaky her hand got when she tried to make them perfectly symmetrical. We ended up with some wonky-looking caps, but those imperfections made them feel more personal somehow, like each cookie told its own little story. When we finally set them out at the graduation party, people kept picking them up just to admire them before eating, which felt like the highest compliment.
Ingredients
- All-purpose flour (2 1/2 cups): The foundation of your cookies, and sifting it together with the baking powder and salt beforehand prevents lumps and ensures even rising.
- Baking powder (1/2 teaspoon): Just enough to give the cookies a gentle lift without making them cake-like, so they stay crispy at the edges.
- Salt (1/4 teaspoon): A tiny pinch that makes the buttery flavor sing and balances the sweetness beautifully.
- Unsalted butter (3/4 cup), softened: Softening it to room temperature means it creams properly with the sugar, which is the secret to light, fluffy dough.
- Granulated sugar (1 cup): The beating time here matters more than you'd think; those 2-3 minutes of creaming create air pockets that make the cookies tender.
- Large egg (1): Adds richness and helps bind the dough together without making it dense.
- Vanilla extract (2 teaspoons for cookies, 1/2 teaspoon for icing): Don't skip the good stuff here; cheap vanilla tastes thin and chemical, and you'll notice the difference.
- Powdered sugar (3 cups), sifted: Sifting matters for the icing because lumps will clog your piping bag and drive you absolutely up the wall.
- Egg whites or meringue powder: Meringue powder is safer if you're worried about raw eggs, and it actually pipes a bit sturdier than fresh egg whites.
- Black and yellow gel food coloring: Gel coloring is thicker and more vibrant than liquid, so you need less and the consistency of your icing stays perfect.
- Mini M&Ms or candy pearls (for tassels): The tiny pop of color at the end of each tassel is what makes people go "oh, that's clever," so don't skip this detail.
Tired of Takeout? 🥡
Get 10 meals you can make faster than delivery arrives. Seriously.
One email. No spam. Unsubscribe anytime.
Instructions
- Whisk your dry ingredients:
- In a medium bowl, whisk together the flour, baking powder, and salt, making sure everything is evenly distributed. This step prevents pockets of baking powder from creating weird holes or making some cookies taste metallic.
- Cream the butter and sugar:
- Beat the softened butter and sugar together for about 2-3 minutes until it looks pale and fluffy, like you're making clouds. You'll know it's right when you lift the beaters and the mixture falls back slowly, forming ribbons.
- Bring in the egg and vanilla:
- Add the egg and vanilla extract and mix until fully combined, scraping down the bowl occasionally because butter likes to stick to the sides. The mixture should look smooth and slightly glossy at this point.
- Fold in the flour gently:
- Add the flour mixture in a couple of additions, mixing on low speed until just combined. Overmixing at this stage makes the cookies tough, so stop as soon as you don't see any white streaks of flour.
- Chill the dough:
- Divide the dough in half, shape each piece into a disk, wrap tightly in plastic wrap, and refrigerate for at least 30 minutes. Cold dough is much easier to roll out and less likely to stick, which saves you frustration.
- Roll and cut:
- Preheat your oven to 350°F (180°C), then roll the chilled dough out on a lightly floured surface to about 1/4-inch thickness. Use your graduation cap or square cookie cutter and transfer the shapes carefully to parchment-lined baking sheets.
- Bake with intention:
- Bake for 8-10 minutes until the edges are just barely golden but the centers still look slightly underbaked. They'll continue cooking slightly as they cool, so pull them out a touch early for that perfect crispy-tender texture.
- Cool completely:
- Let the cookies sit on the baking sheet for a minute or two, then transfer them to a cooling rack and don't touch them until they're totally cool. Trying to decorate warm cookies is like trying to ice a cake that's still hot, and nothing will stick properly.
- Make the royal icing:
- Beat the egg whites or meringue powder mixture until foamy, then gradually add the sifted powdered sugar while beating on medium speed. After about 5 minutes, you should have stiff peaks that hold their shape, which is your signal that the icing is ready.
- Color your icing:
- Tint most of the icing black with gel coloring, stirring really well because black can be patchy if you don't mix it thoroughly. Reserve a small portion and color it yellow for the tassels.
- Adjust consistency:
- Add water a teaspoon at a time to the black icing until it reaches a pourable consistency for flooding, and keep the yellow icing thicker for piping details. This is where a little patience pays off, because icing that's too thin spreads everywhere and icing that's too thick is impossible to work with.
- Outline and flood:
- Using the thicker black icing, pipe an outline around the edges of each cookie, then switch to the thinner icing and fill in the center with a toothpick to help spread it to the edges. Let this set for 30-60 minutes in a dry place.
- Pipe the tassel:
- Once the black icing is completely dry, fill a piping bag with the yellow icing and pipe a small tassel shape on the top of each cap. Add a little button if you want, then immediately place an M&M or candy pearl at the end of the tassel before the icing dries.
- Final dry time:
- Let the cookies sit uncovered for several hours or overnight before packaging or serving, so the icing hardens completely and everything stays in place.
 Save
Save There's a moment that always happens when I finish decorating a batch of these cookies where I step back and look at the whole spread laid out on the counter, and it hits me that these little treats are going to celebrate someone's achievement. Whether it's a high school graduation, college degree, or any milestone, these cookies carry that significance in a way that feels personal and thoughtful.
Storage and Make-Ahead Tips
The beauty of this recipe is that you can completely separate the baking from the decorating, which makes it perfect for when you're juggling a million things before an event. Bake the cookies up to two days in advance and store them in an airtight container at room temperature, and they'll stay crispy and fresh the whole time. Then decorate the day before or the morning of your event, giving the royal icing plenty of time to set solid before you package or serve them.
Troubleshooting Decorating Disasters
I've had icing that was too thin and slid right off the sides of cookies, icing that was too thick and came out in chunky, uneven lines, and more than one moment where I questioned my hand-eye coordination while piping. The good news is that these cookies are forgiving enough that imperfection actually adds charm, and honestly, no one notices the slightly crooked tassels when they're biting into a delicious butter cookie. If you really do end up with a decorating disaster, you can always cover it up with more icing or more sprinkles, and call it "rustic design."
Customizing Your Caps
These cookies are a blank canvas once you get the basic technique down, so play around with colors and decorations to match your event or personality. You could do school colors instead of black and gold, add glitter sugar to the icing, use different shaped cookie cutters, or even pipe initials or numbers onto the caps if you're feeling ambitious. I love that the foundation recipe stays the same but the possibilities for customization are honestly endless, which makes them fun to make year after year for different people and occasions.
- Try using edible gold or silver dust mixed into clear icing for an elegant, shimmery look.
- Pipe tiny names or graduation years onto each cookie if you have a steady hand and patience.
- Make them gluten-free by swapping in a quality gluten-free flour blend in a 1:1 ratio with the all-purpose flour.
 Save
Save These graduation cap cookies are more than just a pretty dessert, they're a little edible congratulations that someone worked hard to create just for the person being celebrated. There's something really meaningful about that, and I hope baking them brings you as much joy as it's brought me over the years.
Common recipe questions
- → What type of flour is best for these cookies?
All-purpose flour provides the ideal texture for crisp yet tender cookies, allowing them to hold their shape well during baking.
- → How do I achieve smooth royal icing?
Beat egg whites or meringue powder with powdered sugar until stiff peaks form, then add vanilla and color gels gradually for a glossy finish.
- → Can I prepare the cookies in advance?
Yes, cookies can be baked up to two days ahead and decorated the next day for best results and ease.
- → What tools are needed for decorating?
Small piping bags and toothpicks help create precise outlines and tassels, while a graduation cap-shaped cutter shapes the cookies.
- → Are there allergen considerations?
These cookies contain wheat, eggs, and dairy. Check candy toppings and food colorings for additional allergens.